Autumn

Rustic Thanksgiving Pumpkin Decorated Cookies

I can never decorate too many pumpkin cookies during this season.
I love dreaming up as many designs and textures on cookies as possible.
This year was no exception.


We're getting our Thanksgiving "on" in a rustic pumpkin-kind-of-way.


Check out this Textured Pumpkin Decorated Cookie Tutorial for one of the techniques shown in some of the pumpkins above.

May your Thanksgiving be filled with lots of pumpkins!

Autumn Leaf Thanksgiving Turkey Decorated Cookie Collection

Making a platter of cookies look like a turkey for Thanksgiving is nothing new. But the twist on this set is to use the feather shapes to make autumn leaves.

Any way you construct it, the results will be charming.

Gobble gobble......

Cookie Cutters found HERE.


May your Thanksgiving dessert table be adorned with a cute turkey cookie platter.....


Thanksgiving Dinner Place Card Decorated Cookies (Tutorial)


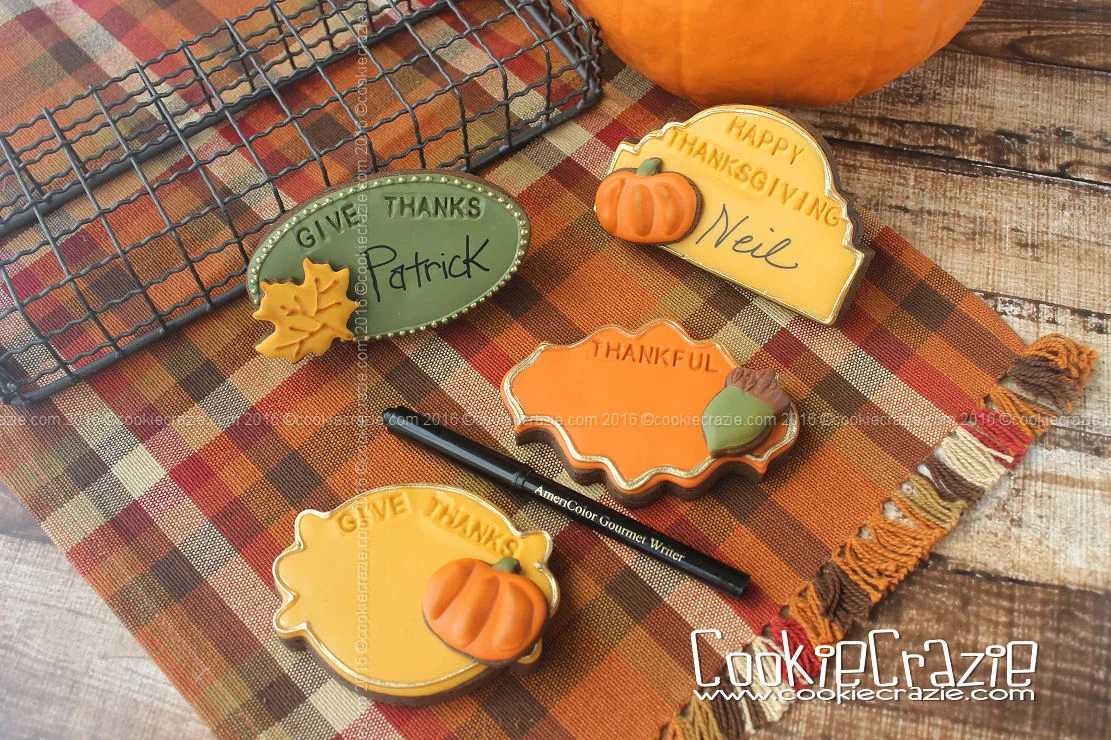
I've dreamed of making place card cookies for Thanksgiving year after year and it hasn't happened until NOW. Hurray! What fun it is to gather family and friends around the table and designate their places with personalized cookies.

There are so many possibilities for place card cookies. Pick a plaque or geometric shape that fits the event or the people invited, and personalize them for each guest. And of course, this idea is not limited to Thanksgiving. It could be used for any holiday, birthday, wedding, etc.

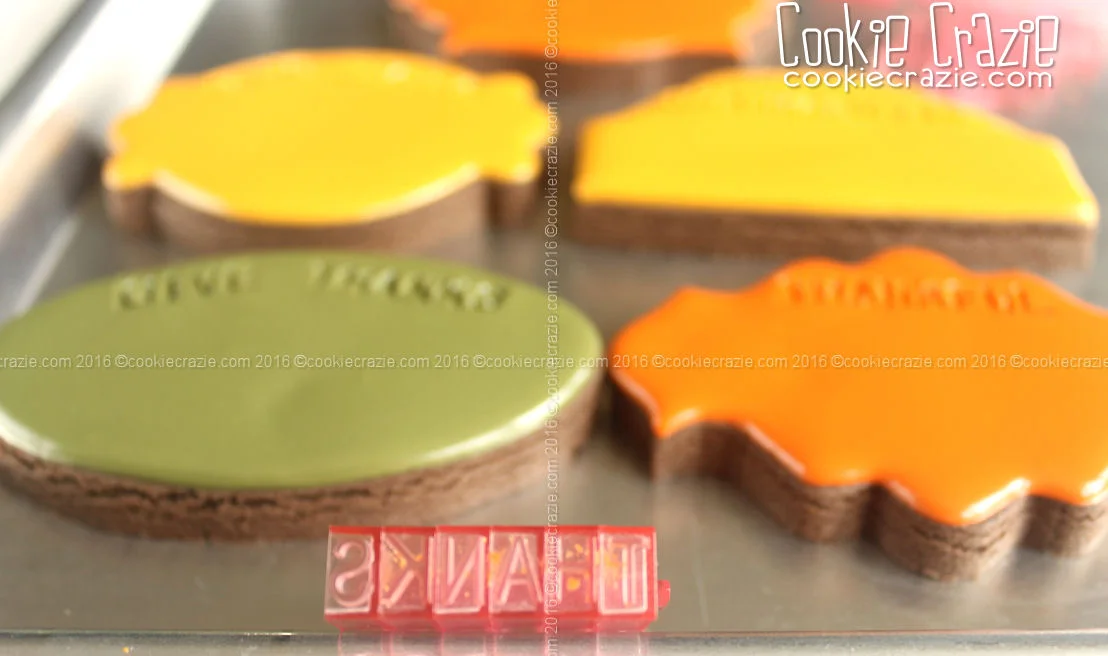
I always hesitate to write words on a cookie. I'm rarely happy with my printing on a cookie. So anytime I can get out of it, I will! This time I tried out these awesome Snap Together Letter Embossers and they worked well.

Outline and flood the cookie with glaze. Allow it to dry for about 2-3 hours.


Pick out the words you desire to express on the plaque, snap them together, and gently press them into the glaze.


Embellish each cookie as desired.
 

Once the cookies have dried overnight, use a food color marker to add the names of the guests to the cookies.

P.S. Don't be surprised if this year's Thanksgiving Dinner starts with dessert! ;)

Indian Corn Decorated Cookie (Tutorial)

For some reason, Indian corn cookies have been hard to emulate in the past.
Either they were way too detailed and time consuming, or
they didn't appear the way I wanted them to.
Now with fondant embossers, I found a design that I really like....
and it's not too time-consuming.


Believe it or not, I used a tall Easter egg cutter for this design.
But a longer oval will work just fine.

Outline and flood the entire shape in gold glaze.
Allow the icing to dry for at least 3 hours, and then use either one of these embossers to imprint "kernel" marks into the glaze.

There are other brick texture mats that also might work to make these impressions.

Using orange and brown glaze, outline and flood a few random kernel impressions
throughout the cookie.
(see photo below)

Dry overnight.

Dust dry chocolate luster dust over the kernels to give it a shaded and rustic look.


Harvest Mason Jar Decorated Cookies (Tutorial)

Mason jars continue to be a common staple shape in the vintage, shabby chic, & rustic genre. Here's four different ways to decorate them.


First Option

After you have cut, baked, and cooled the mason jar cookies, paint them with diluted autumn colors like lemon yellow, orange & chocolate brown. These gels were diluted with almond extract.

Allow the gel to dry on the cookie. Outline and flood a wide swath of the jar with gold glaze.
(see photo below)

Allow the glaze to dry for 3-4 hours. Use a burlap texture mat on the partially dried glaze to create a burlap-look.

Add dots and lines of white glaze to the edges of the "burlap" to create a lacy border.

Second Option

Outline and flood the entire jar with a glaze color of your choice. Allow the glaze to dry for 2-3 hours and then press a mini cutter into the partially dried glaze. Use that impression outline to create a cute autumn shape on the front of the jar.

Third Option

Divide the jar into three portions and outline and flood each part with the colors of candy corn.

Once the cookie is dry, you can tie bakers twine around the jar and tie it in a bow.

Fourth Option

When baking the mason jar cookies, impress some dough with the burlap impression mat, and cut out a mini cookie using the same method shown in this tutorial. Be sure to cut out a hole at the top of the cookie (with a straw) so that you can tie it to the mason jar.

 (Scroll down below to see the finished burlap impressed cookie....a mini acorn hanging on the jar.) 

Outline and flood the jar in your choice of glaze color. Outline and flood the lid with grey glaze.

Dry overnight. Make a mixture of silver dust and vodka or almond extract,and paint it over the lid of the mason jar.

Brush dry caramel dust over the burlap impressed mini cookie to give a rustic look.

Attach the mini cookie to the jar with bakers twine.


Member Login
Welcome, (First Name)!

Forgot? Show
Log In
Enter Member Area
My Profile Not a member? Sign up. Log Out