Sanding Sugar

Patriotic Freezer Pop Decorated Cookies (Tutorial)


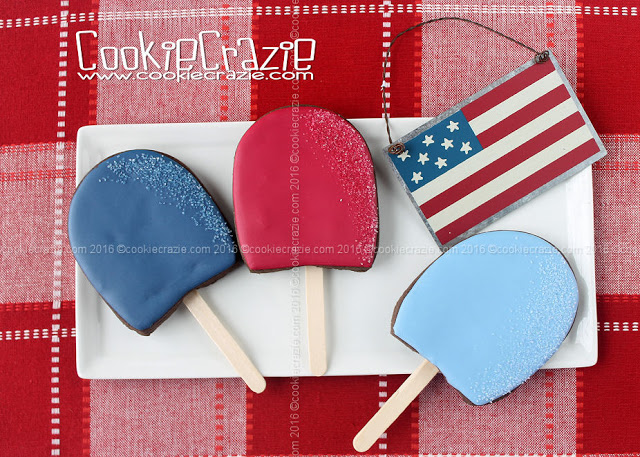
Here's some simple freezer pop cookies that can be dressed in
red, white, and blue for Independence Day.


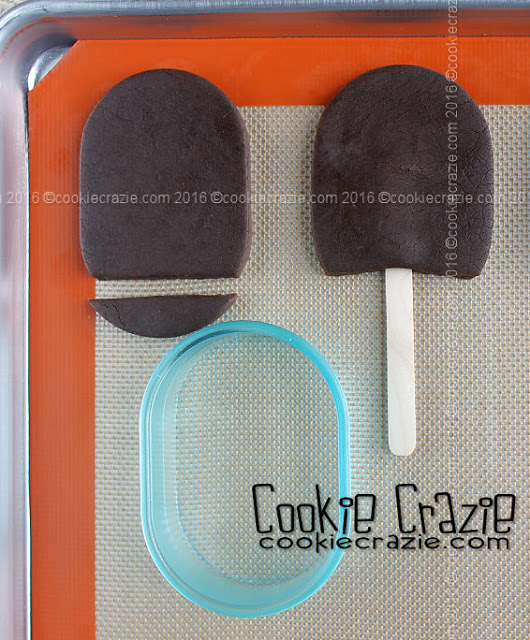
Use a oval cutter and slice off the bottom end to cut out this cookie shape.
(see photo below)
P.S. Have I mentioned that I love Ateco cutters. :)

On the flat bottom edge, carefully push in a food-safe freezer pop stick.
(Note: I had originally taken the stick out to bake the cookies and planned to reinsert it after decorating the cookies, but that plan did not work.  Therefore, I would recommend leaving the stick in the cookie dough while baking and through the decorating process. :))


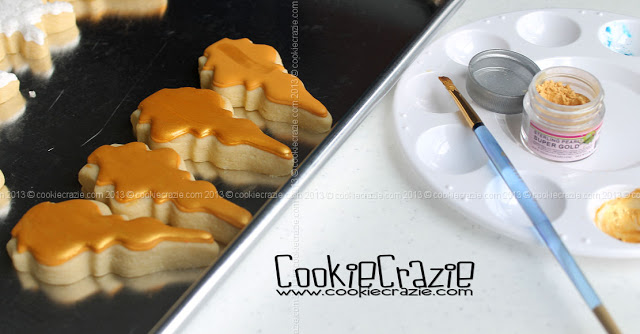
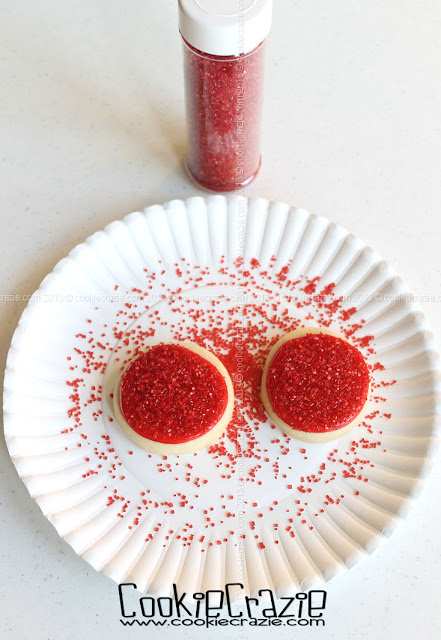
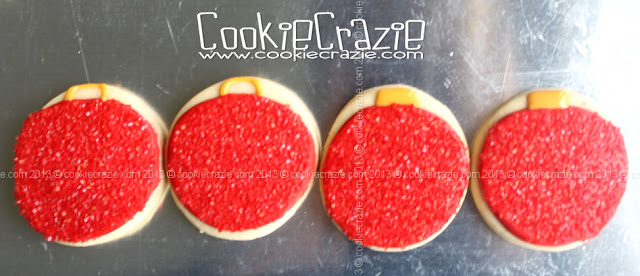
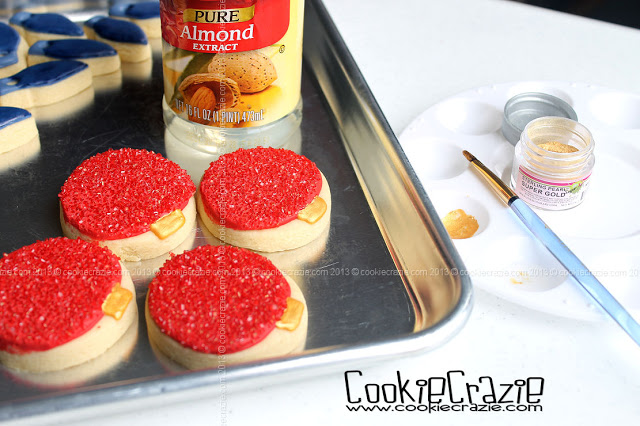
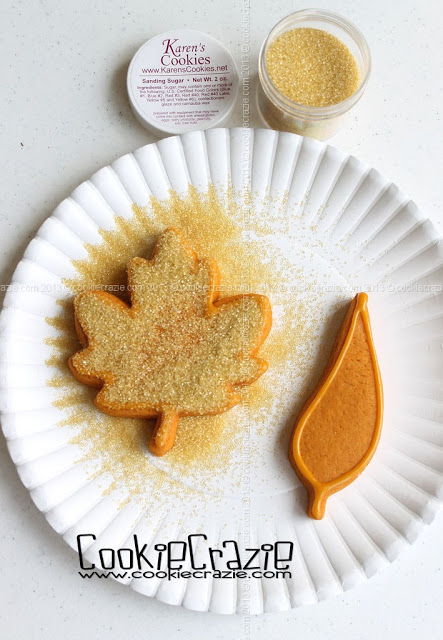
Outline and flood the pops in patriotic glaze colors.


Immediately after flooding, place the cookie in a tray mate and 
sprinkle white sanding sugar down one side to resemble frost on a freezer pop.
Shake off the excess and then conveniently pour the remaining sugar back into the jar.


So quick and easy.....and yet so cute. :)


2016 Primitive Patriotic Decorated Cookie Collection

Christmas Ornament Cookies (Tutorial)


In preparation for making a Christmas tree cookie platter,
I need to make cookie ornaments to "place on the tree".

I happen to choose two fairly "classic" ornament shapes, a snowflake, and a star......
but there is unlimited possibilities of ornament cookies you could create.

For the snowflake, outline and flood it with white 10-second glaze and allow to dry overnight.


Once it is completely dry, add any detailing in white glaze on the flake.....
and then cover it in white sanding sugar or white sugar crystals and shake off the excess.
(I used white sugar crystals on these snowflakes.)


For the gold "fancy ornaments",
use the bottom portion of a much larger ornament cutter to make smaller cookies.
Here's the cutter used.
Outline and flood with gold 10-second glaze and dry overnight.


Using a mixture of almond extract and super gold petal dust,
paint on a beautiful gold sheen.


For the classic round ornament, no need for a specific cutter.
Just cut a round cookie and make the glaze circle a bit smaller to
make room for the golden ring at the top.

Outline and flood the circle in your color of choice and
immediately cover in a coordinating sanding sugar color.


After it has dried about an hour, add the gold rim at the top (see photo below).
Allow the cookie to dry overnight.


As with the fancy gold ornament, paint gold pearl dust onto the gold rim of the ornament.


For the star topper, use a cutter like this one.
Make a mixture of sanding sugars (white and gold) and gold crystals.


Outline and flood the star with gold 10-second glaze,
and then cover in the mixture mentioned above.
Shake off the excess.


Even though this is a rather dull set of cookies at the moment......
soon you will be seeing them in a much more beautiful setting. :)


Christmas Tree Cookie Platter

Acorn Cookie Love (Tutorial)


Awww.....acorns.

Another one of those favorite shapes at this time of year.

There's a variety of acorn cookie cutters out there.
Here's a few favorites.....
3" Acorn Cutter from Cheap Cheep Cookie Cutters
Mini Acorn Cutter from The Cookie Cutter Company
5" Acorn Cutter from Off the Beaten Path
 
Now for the decorating......

Since the bottom of the acorn is usually the smooth part......
outline, flood, and dry it first using brown, tan, or green.


The acorn tops are my favorite part......because they NEED texture. :)
I love texturizing cookies.....

Sanding sugar is a texture lover's friend.
For the cookies below, I made a mixture of demerara sugar,
The variety of color and texture in this mix makes it very appealing.

Outline and flood the top of the acorn.
While it's wet, sprinkle sugar over it and then shake off the excess.


To get a more "bumpy" looking acorn top,
outline and flood with brown and then allow it to dry for an hour or two.
(Using a food dehydrator on low....speeds this process up.)
Using a rounded tool, press gently into the glaze to add some bumps.


A similar yet different texture is to allow the glaze to dry for an hour or two 
and then gently press a napkin or paper towel into the semi-dry icing.


Let your imagination run.....
and come up with even more creative ways to make a cute acorn cookie.

Rimmed Autumn Leaf Cookies (Tutorial)


Rimming leaf-shaped cookies makes for a pretty yet EASY option for a fall cookie collection.

Coloring the dough will cut the decorating time way down.


Cut out the leaf shapes and bake as usual.

Outline the cookie with whatever color glaze you prefer.

On a paper plate or rimmed dish, cover the wet glaze with color coordinating sanding sugar.

Shake off the excess sugar.


Another rimmed effect........outline the cookies with glaze and allow them to dry overnight.

Mix almond extract with some gold luster dust and paint it on the dried outlines.


Oh the possibilities......so many......but so little time. ;)

2013 Fall Leaves Cookie Collection

Sunflower Cookie Platter (Tutorial)


For this sunflower cookie platter, you'll need:
15 Petal Cookies (I used this cutter and cut off the stem)
1 Large Circle Cookie (I used a 4" diameter circle cutter)
1 Long Stem Cookie
1 Leaf Cookie

Outline and flood the petal cookies in gold 10-second glaze and
the leaf/stem cookies in green 10-second glaze.

There are many ways you can do the center of a sunflower.....
so try my method or run with your own imagination. :)

Outline and flood a circle rim within the circle cookie in brown 10-second glaze as shown.
While the glaze is still wet, place chocolate jimmies around the rim.

Once the rim has dried for an hour or so, flood the center of the cookie with brown glaze
and then cover it with brown sanding sugar.


Allow the circle cookie to dry for an hour.

While waiting, go back to the petal, stem, and leaf cookies and add some accents, if desired.


Make a mixture of demerara cane sugar and gold sugar crystals.
Outline and flood the outer part of the cookie with tan 10-second glaze.
Sprinkle the sugar mixture on top and then shake off excess.


After allowing all cookies to dry overnight, assemble the sunflower on a decorative platter.


Member Login
Welcome, (First Name)!

Forgot? Show
Log In
Enter Member Area
My Profile Not a member? Sign up. Log Out