Tutorial

Poinsettia Basket Decorated Cookie (Tutorial)

At the last minute last Christmas, I made a basket cookie with a poinsettia, and decided to revisit it this year with a tutorial.

The sweet part about the time lapse is that I have acquired an even better basket weave texture mat. :)

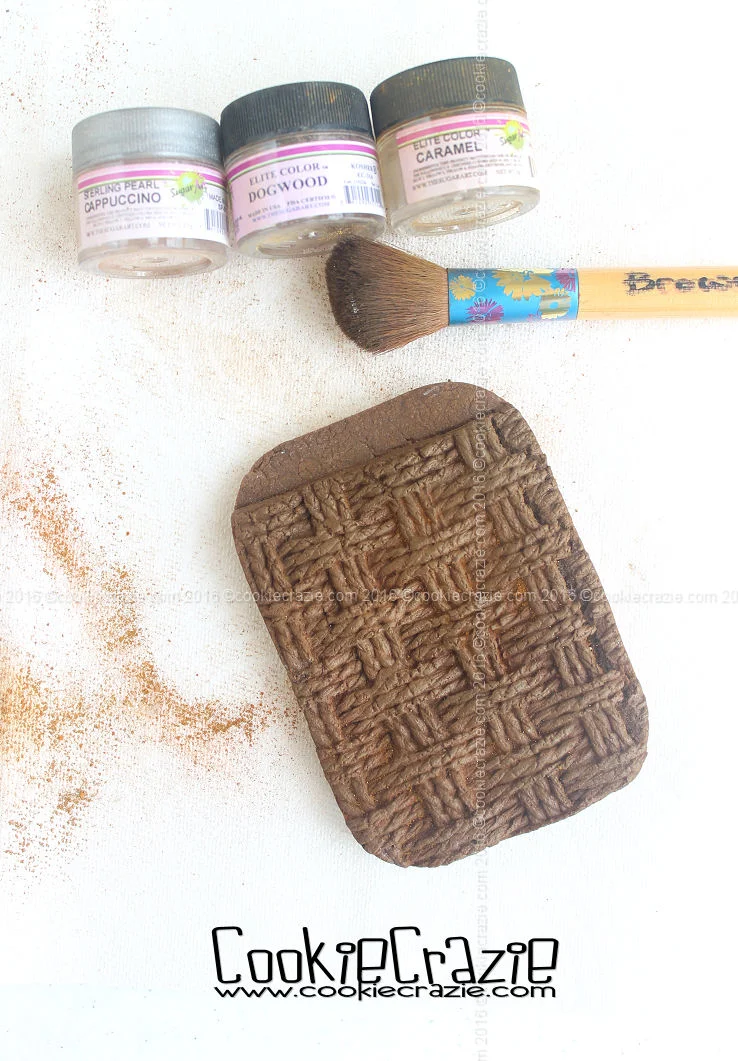
Rustic Basket Weave by Karen Davies (favorite)
Basketweave Embosser

There are two ways to achieve the basket weave effect on the cookie.

  1. Impress the weave into the cookie dough before baking
  2. Flood the cookie with glaze and use the mat once it is partially dry


To impress the dough, you'll need to initially roll the cookie dough thicker than usual, and use the rolling pin on top of the mold to impress the weave deeply into the dough.

(see photo below)

Once the dough is molded, use your rectangular cookie cutter to cut the desired shape.

After the cookie is baked and cooled, brush dry cappuccinodogwood, and caramel dusts over the cookie for a more dimensional look.

(Note: I used these lighter colors on the dark chocolate cookie.
If the regular sugar cookies are used, you will need to use different colors of dust.)

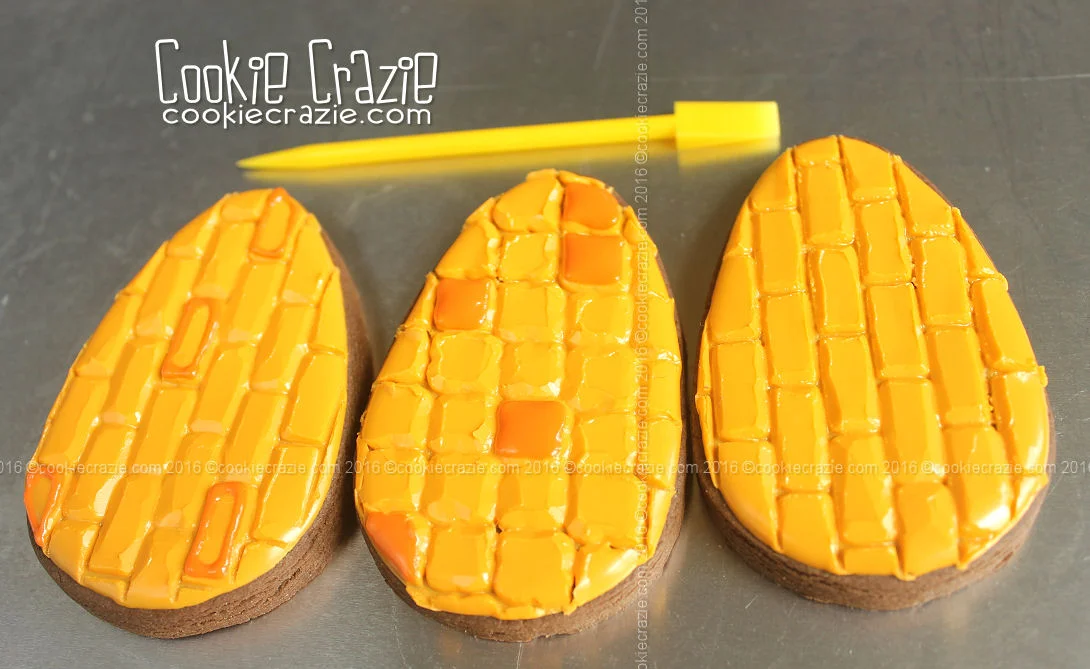
Add the first layer of the poinsettia with red glaze.
(see photo below)
Add a second layer of petals at least 30 minutes after the first.

Carefully place yellow pearls within the center of the poinsettia.


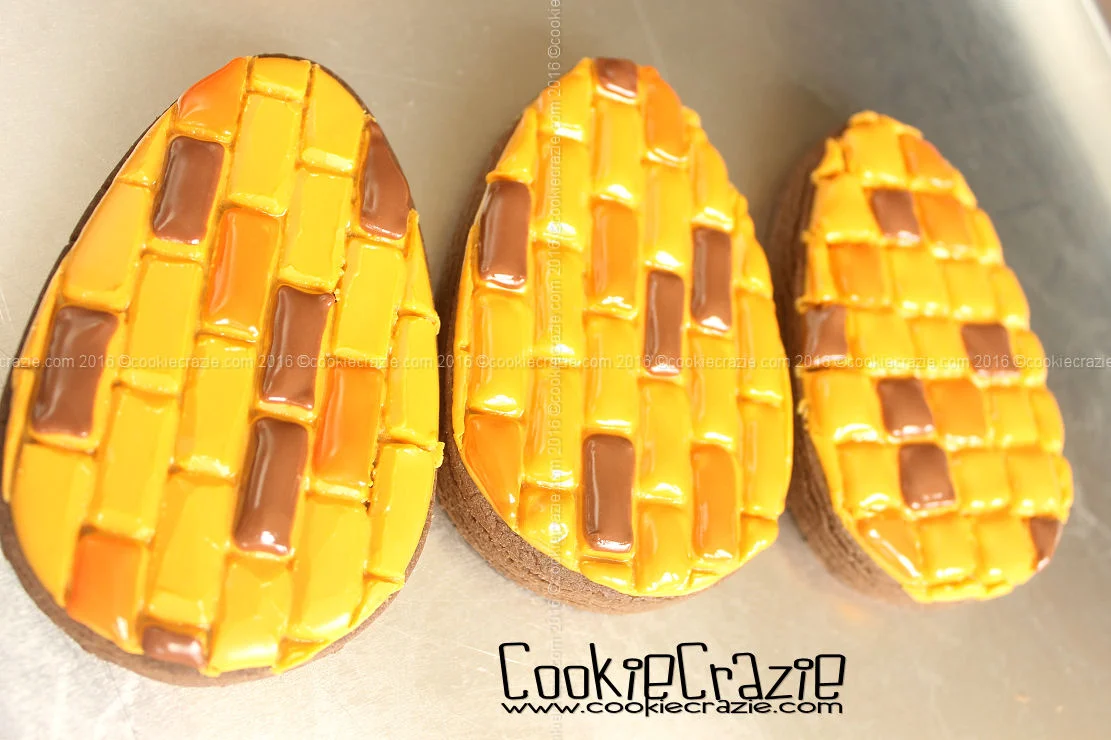
For molding partially dried glaze, outline and flood the cookie with brown glaze.

Allow the cookie to dry for 4 hours and then press the mat into the glaze.

Dry the cookie overnight.

Brush over the dried glaze with dry chocolate dust.

In the same way as above, pipe a poinsettia with red glaze over the top of the basket.
Then add the yellow pearls to the center.


Indian Corn Decorated Cookie (Tutorial)

For some reason, Indian corn cookies have been hard to emulate in the past.
Either they were way too detailed and time consuming, or
they didn't appear the way I wanted them to.
Now with fondant embossers, I found a design that I really like....
and it's not too time-consuming.


Believe it or not, I used a tall Easter egg cutter for this design.
But a longer oval will work just fine.

Outline and flood the entire shape in gold glaze.
Allow the icing to dry for at least 3 hours, and then use either one of these embossers to imprint "kernel" marks into the glaze.

There are other brick texture mats that also might work to make these impressions.

Using orange and brown glaze, outline and flood a few random kernel impressions
throughout the cookie.
(see photo below)

Dry overnight.

Dust dry chocolate luster dust over the kernels to give it a shaded and rustic look.


Sunflower Decorated Cookies (Tutorial)

Oh how I love sunflowers. You can always tell my favorites by how many tutorials I've done in the past on a particular shape. Trust me.....I've done a few sunflower cookies. ;)

This design is a little different in that an additional layer of cookie dough petals is added to the flower. Also, the flower center is a separate cookie in order to add more dimension.

Cut out two sunflower cookie shapes and one circle cookie that will fit over the top as the center.

To the second sunflower cut-out, remove the center dough with a round cutter.

(see photo below)

Using a pancake turner, carefully move the extra sunflower petals to the first sunflower cookie. Lay the petals so they are alternating with the bottom base petal positions. Bake and cool the cookies as usual.

Outline and flood all of the petals with gold glaze.

Make a thick outline on the circle cookie with dark brown glaze.

(see photo below)

Immediately cover it with chocolate jimmies and shake off the excess.

Allow the circle cookie to sit for at least 15 minutes. Fill the inner circle with medium brown glaze.  Cover it with brown sanding sugar and shake off the excess.

Lay the round center on top of the sunflower petal cookie. If desired, you can "glue" the two together with some extra icing.

 
Member Login
Welcome, (First Name)!

Forgot? Show
Log In
Enter Member Area
My Profile Not a member? Sign up. Log Out