sugar pearls

Wedding Shower Flower Cookies (Tutorial)


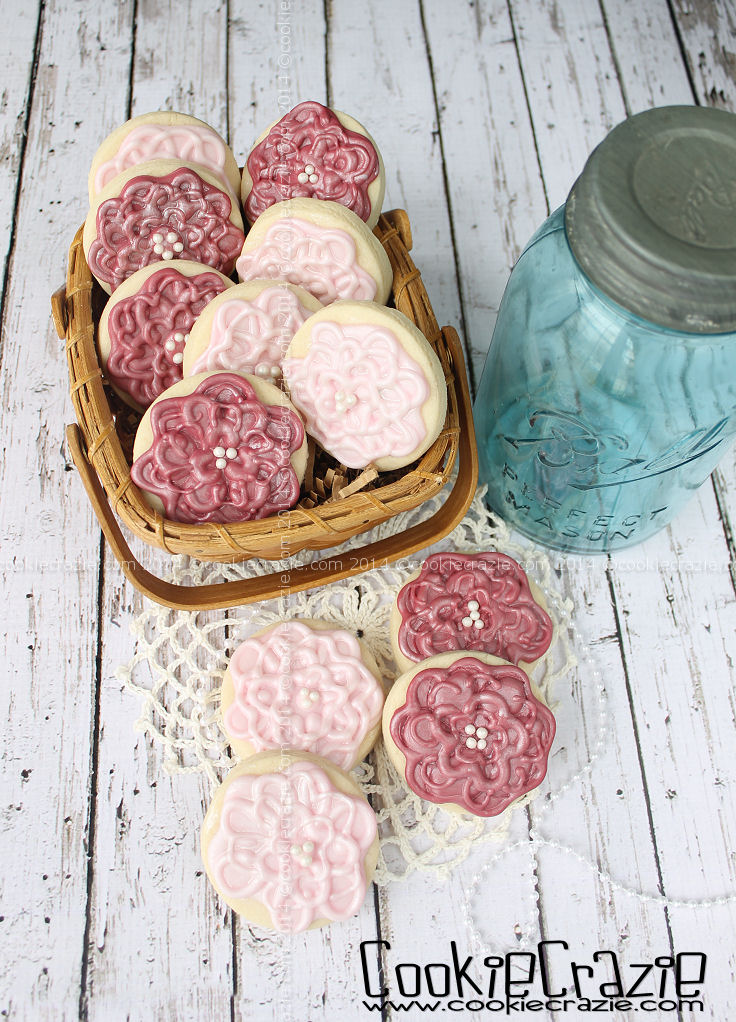
Allison's wedding shower invitation had some cute simple flowers on it.
I attempted to re-create them to pair up with the mason jar cookies.

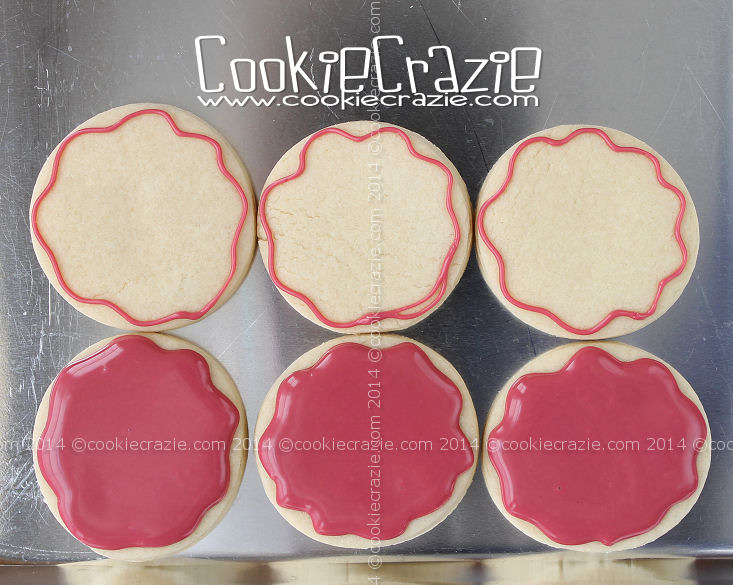
Simple circle cookies will do nicely for the shape.
(wow.....no special cutter!)

Outline & Flood the cookie in your color-of-choice 10-second glaze.
Make a squiggly line around the edge to give it a flower look.


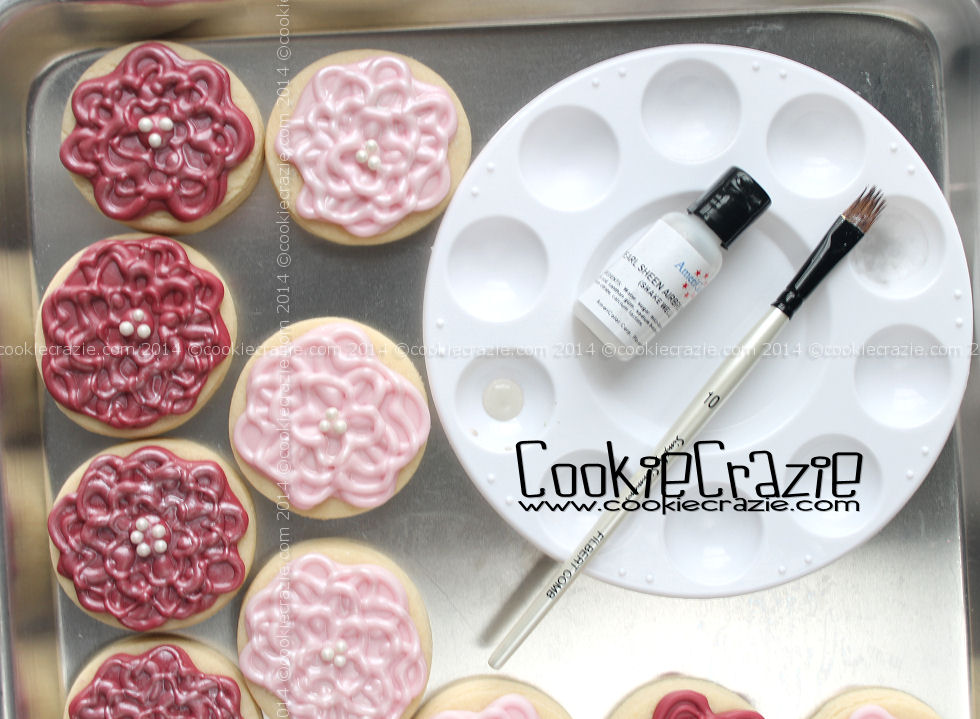
Let the glaze set for about 30 minutes and then add the first layer of petals (outside layer).
(See photo below)
Once that has dried for about 30 minutes, add the middle layer.
Dry for another 30 minutes and add the inside layer.
Add a dot of glaze in the center and place a few sugar pearls atop it.


Dry overnight.
If desired, brush on some pearl sheen airbrush color.


Winter Rectangle Buddie Cookies (Tutorial)


I divided my rectangle buddie cookies into two sets......

Here's the snowmen, reindeer, and penguins...


For the rectangle snowman cookies, I did a top hat snowman and a knitted cap snowman.

Outline and flood the entire cookie with white 10-second glaze.
Give it a few hours to dry since black and white tend to bleed together.
Add the top hat shape in black glaze, a knit cap in your choice color,
 and the draping part of the scarf with any pattern you'd like.
At this point you can also add white circles for eyes and drop black pearls in the middle of them.
Add a white glaze carrot nose and paint it the next day (once it is dry) with orange color gel.
(I always try to keep from making extra colors of glaze that can be dealt with other ways.)
Add tiny dots of "coal" in black glaze for the smile.


Once the hat and scarf have dried a bit, 
add the pom pom to the top of the hat and the hanging end of the scarf.


The next day, if desired, you can add details like pink cheeks by brushing on pink pearl dust,
and eye brows with a black food color marker.


Reindeer require outlining about 2/3 of the rectangle with brown glaze.
Add some curly antlers also in brown glaze.


After they've dried for an hour or two,
add huge white glaze circles for the eyes and drop a black pearl in the centers.
Make the muzzle with a large brown circle under the eyes.
Drop a black or red pearl on the top part of the muzzle for a nose.


The next day, use a black food color marker to add eyebrows, mouth, and other details.


Penguins.....always a favorite!
Cover the entire rectangle with black 10-second glaze.
Because of bleeding problems, I dried mine overnight.
On Day 2, add "heart shaped" face and a long white front with white glaze.
Drop black pearls onto the white glaze for eyes.


Add brown glaze "feet".


I wanted the penguin to have a red "plaid" scarf but didn't want to mess with the bleeding issues.
So I added a white neck band and then painted it with red color gel the next day.


If desired, add some pink cheeks with pink pearl dust and a mouth with a black food color marker.


Rectangle Buddie Cookies

Gumball Machine Cookie Collection


Gumballs and gumball machines.......
A set of cookies I've been wanting to do for a long time.
There's something about candy-related cookies that are just plain F-U-N.
And the pastel colors are always a winner. :)

For a tutorial on the gumball machine cookies, click here.


Gumball Machine Cookies (Tutorial)


Oh how I love gumball machines. 
I use to own a real one that I had in our entry way.......
it held M&Ms in colors to match the season/holiday. :)

I saw this cute scrapbook sticker and knew this was the simplified version I wanted to try. :)

I didn't have a cutter......so I squished a circle on top of a modified triangle. ;)

Outline and flood the base of the machine.

(I chose pastel colors because I was dying to use these pretty pastel pearls as the gumballs. :))

 After the base has dried a bit, outline and flood a white circle on top and
immediately drop the pearls into the wet glaze.

 Add some light gray glaze to emulate the mechanical parts.

If desired, you can add a "gumball" to the dispenser at the bottom.

Allow the cookies to dry overnight.
Mix up some silver pearl dust and almond extract
and paint it onto the mechanical parts of the machines.

These cookies make me happy. :)


Buggin' Out Cookie Collection (2-D Bug Cookies)


Oh what fun I had making five different kinds of 2D bug cookies 
and adding accent cookies to each theme. :)


Click on the photos to see the tutorial posts.


Buggin' Out Cookie Series
Member Login
Welcome, (First Name)!

Forgot? Show
Log In
Enter Member Area
My Profile Not a member? Sign up. Log Out