

In previous posts.....we've been preparing to create a Christmas tree cookie platter
by making ornaments and stringed lights.
It's time to make the tree trunk and tree branches.
Use a long rectangle to make the tree branches.
I used a 5" by 2" rectangle I ordered from Ecrandal,
but you could use a different rectangle or even hand cut these cookies.
Since they're the trunk of the tree.....they certainly don't have to be exact.
Measure your platter to know how many trunk cookies you'll need.
My platter accommodated three trunk cookies.
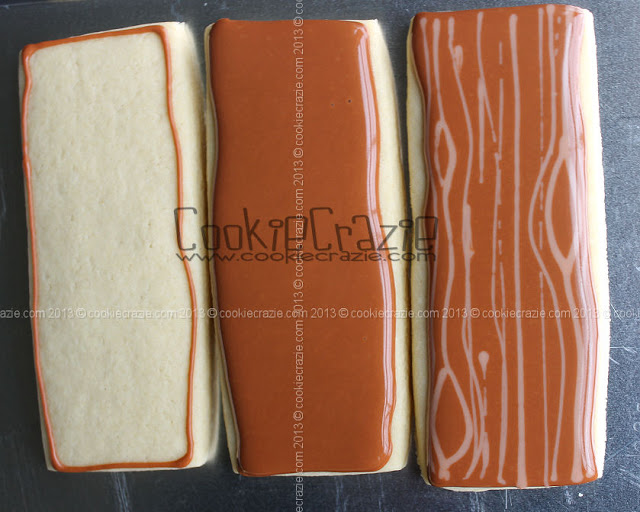
Outline and flood the rectangles with brown 10-second glaze.
Immediately add wood grain lines using a lighter tan glaze and the wet-on-wet technique.
I used a 5" by 2" rectangle I ordered from Ecrandal,
but you could use a different rectangle or even hand cut these cookies.
Since they're the trunk of the tree.....they certainly don't have to be exact.
Measure your platter to know how many trunk cookies you'll need.
My platter accommodated three trunk cookies.
Outline and flood the rectangles with brown 10-second glaze.
Immediately add wood grain lines using a lighter tan glaze and the wet-on-wet technique.
For the branches, use Christmas tree cutters.
You'll need longer branches on the bottom layer and shorter branches for the middle layer.
I used this cutter (5" x 3-1/2") and this cutter (3 1/8" x 2").
Add wood branch lines on the cookies with brown 10-second glaze.

After they have dried for at least 30 minutes, add the green tree needles all over the branches.
This is the most time consuming part......but well worth the outcome.

Allow the cookies to dry overnight.
Gather your ornament cookies and stringed-lights cookies with the trunk and branch cookies......
and assemble the platter.
Line up the trunk cookies down the middle of the platter.
Next layer the branch cookies.....larger ones on bottom.....along the trunk.


Arrange the stringed lights, ornaments and star topper as desired.

Enjoy a wonderful Christmas season.....filled with lots of
gorgeous sights......
enticing smells......
yummy tastes.....
and
beautiful sounds......
It's the most wonderful time of the year!

Christmas Tree Cookie Platter